Get started
Quick start
A first session step by step: add a project, create an agent, choose its model, effort and permission mode, give it a request, answer its questions, review what it changed and commit.
Before you start
You need Claude Code installed and signed in to your Claude account, and git (see installation). On macOS, Ctrl becomes ⌘ in the shortcuts of this page.
Add a project
A project is a folder of code. On the welcome screen, click “+ Add a project”. Later, the + button to the right of the tabs in the title bar does the same. The “New project” window opens:
| Field | What it does |
|---|---|
| “Folder” | The path of the project. “Browse…” opens the folder picker. Under the field, a line says what Escouade knows about the folder: “Git repository detected · branch main · clean” (or the number of changed files), “No git repository · one will be initialized” or “Folder not found”. |
| “Name” | Filled in with the folder’s name, which you can change. “Tab preview” shows the tab as it will look. |
| “Color” | One of the 14 colors offered; the first one no project uses yet is picked for you. It tints the tab and the interface while the project is on screen. |
| “Create a first agent” | On by default: “Opens a conversation in this project right away”. The “Fable”, “Opus”, “Sonnet” and “Haiku” buttons, each with its version, choose its model; the one of the “Default model” setting is already selected. |
| “One git worktree per agent” | Off by default: “Keeps each agent’s work apart and shows its changed files separately”. You can turn it on later, see worktrees. |
Click “Create project” (the button stays grayed out until the folder exists). The project opens in a new tab, with its first agent if you asked for one.
Note
If the folder is not inside a git repository, Escouade runs git init to create one: without git, there would be no diff and no commit to review.
Create an agent
An agent is a conversation with Claude Code in this project. To create one, press Ctrl+N or click “+ New agent” at the top of the sidebar: the agent is created without asking you anything, and its conversation appears. It is called agent-1, agent-2… until its first request; Escouade then gives it a short name taken from what you wrote. To rename it yourself, double-click its name.
Its status is “Ready”, and the empty conversation says “Agent ready”, with the folder it works in. The ▾ arrow to the right of “+ New agent” offers “New agent on a branch…” (see branches).
Choose the model, the effort and the permission mode
Under the message field, three menus set up the agent (a fourth one, “Account”, appears when you have several Claude accounts). You can change them in the middle of a conversation.
| Menu | Choices |
|---|---|
| “Model” | “Fable”, “Opus”, “Sonnet” and “Haiku”. Each runs the latest model of its family that Claude Code knows, and shows its version (for example “Sonnet 5.5”). |
| “Effort” | “Low” (quick answers, little thinking), “Medium” (balanced), “High” (deep thinking), “Very high” (very deep thinking), “Max” (maximum thinking, uses more tokens). Haiku doesn’t support effort. |
| “Mode” | The permission mode, described below. |
The permission modes decide when Claude asks you for permission to act:
| Mode | What happens |
|---|---|
| “Auto” | A classifier approves safe actions and asks about the rest. Unavailable with Haiku. |
| “Ask” | Claude asks for your approval before each sensitive action. |
| “Plan” | Claude analyzes and proposes a plan without changing anything. |
| “Accept edits” | File edits are accepted without asking. |
| “Bypass” | No permission requests. |
A new agent starts with the values of Settings › Claude Code: “Default model” (Sonnet), “Default effort” (Medium) and “Default permission mode” (Auto). See the Claude Code settings and agents.
Warning
In “Bypass” mode, Claude acts without any permission request: Escouade reminds you of it when you choose it. Keep it for safe environments.
Send a first request
Click in the message field, describe the task (“Describe the task to give to Claude…”), then press Enter to send. Shift+Enter starts a new line.
- Type
@followed by a bit of a file name to pick a file of the project, or/to pick a command. - Paste or drop an image, a PDF or a text file into the field, or click the paperclip, to attach it to the message.
As soon as you send, the agent’s status changes to “Running” and the conversation says “Claude is working…”. Its tool calls show up as compact rows that you can unfold. You can write to it while it works: it takes your message into account at its next step. To stop it, press Esc in the message field or click “■ Stop”.
Answer a question or a permission request
When Claude needs you, a card with an amber border appears in the conversation, the agent’s status becomes “Question”, and its tab and card blink if you are looking elsewhere. There are two cards.
“Claude is asking for permission” names the tool and what it is about to do. Three buttons:
- “Allow” (
Ctrl+Enter); - “Always allow” (
Ctrl+Shift+Enter), when Claude Code offers to remember the choice; - “Deny”.
To deny and explain what to do instead, write it in the message field and send it. When Claude Code would deny the request by default, “Deny” is the main button and only a click on “Allow” grants it: the keys don’t answer. When Claude proposes a plan, the card is called “Claude proposes a plan” and the buttons are “Approve the plan”, “Approve and accept edits” and “Keep planning”.
“Claude is waiting for your answer” asks a question with options. Click an option, or press Alt+1 to Alt+9, or answer freely in the message field. With a single single-choice question, the answer goes out as soon as you click; with several questions or a multiple choice, “Submit” (Ctrl+Enter) sends the answers.
Tip
Ctrl+J opens the next agent that is waiting for your answer, with the cursor in its message field. A card that has just arrived ignores the answer keys for half a second, so that a keystroke meant for your message doesn’t answer in its place.
See what the agent changed
When Claude has finished, the status becomes “Done” and a “Task done” card gives the duration, the tokens, the cost and the list of edited files; a click on a file opens it in the editor.
To review the changes, open the “Uncommitted” panel: click “Files ▸” in the header of the conversation, or press Ctrl+Shift+B.
- Each row is a file, with its letter (M for modified, A for added, D for deleted) and its added and removed lines.
- A click on a file opens its diff in a large window. “Unified” and “Side by side” change the layout,
Esccloses the window. When there are several files, a column on the left lets you switch from one to another. - “Show diff” opens the diff of all the files in the list.
- “This agent” lists the agent’s files; “Whole project” lists those of all the project’s agents.
To keep the conversation and the diff in view together, switch to the side-by-side layout with Ctrl+Shift+L: the panel stays displayed on the right and shows the diff of the chosen file under the list.
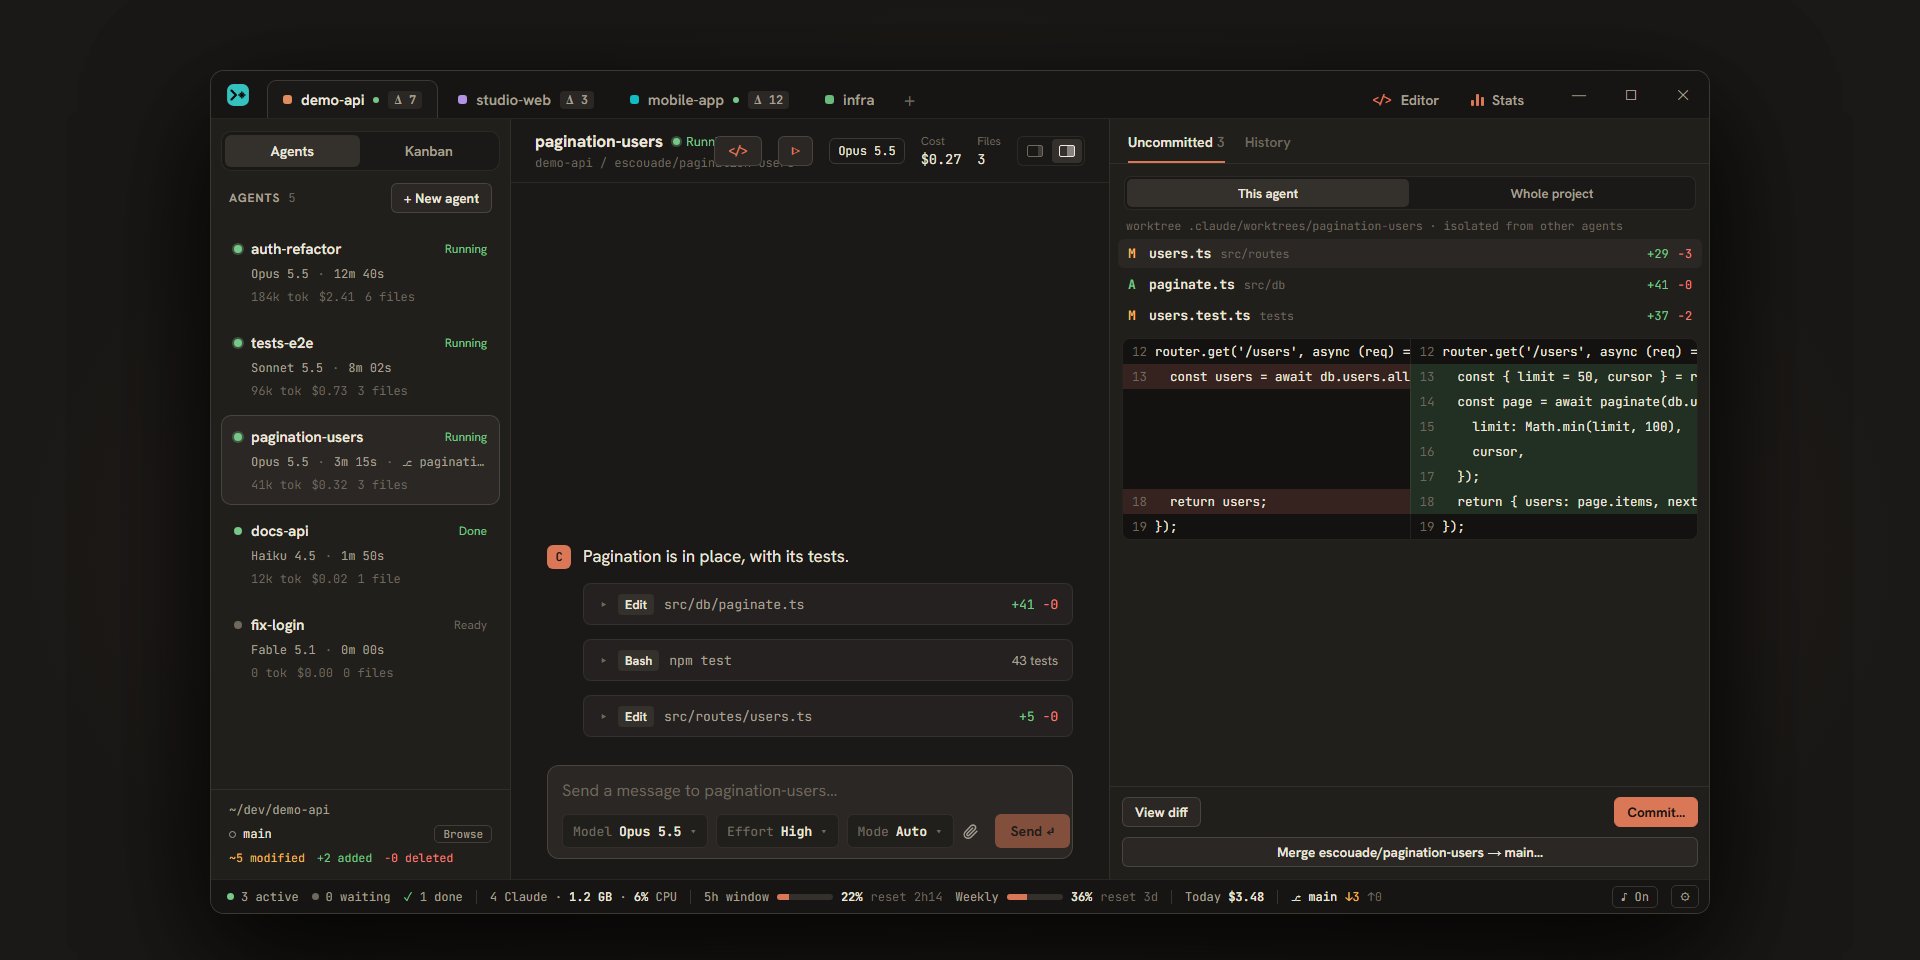
Commit
The “Commit…” button of the panel commits the agent’s changes (“Commit all…” when “Whole project” is chosen). What happens depends on the project’s “Commit” setting, in Settings › Projects:
- “Written by the agent” (the default): Escouade sends the agent a message asking it to commit its changes with a clear message in Conventional Commits format. A short-lived message confirms “Commit request sent to” followed by the agent’s name, then the agent commits like it does for any request.
- “Direct, with a suggested message”: the “Commit” window lists the files, Haiku writes a message that you read and edit, “Regenerate” asks for another one, and “Commit” commits. Nothing is committed without that click.
If the agent works in a worktree, the panel also offers “Merge … → …”, which merges its branch into the project’s. See Git and commits and worktrees.
What next
- Agents and the conversation: permission modes, messages, images, search, history.
- Notifications and keeping track of agents: get notified, answer without opening each conversation.
- Git and commits, worktrees and branches: review, commit, isolate agents.
- The editor, terminals and running the project.
- The Kanban and autopilot: hand tickets to agents.
- Claude accounts and quotas and cost.
- The keyboard shortcuts and the interface for a tour of the window.